A Healthy Starter on Sterilization
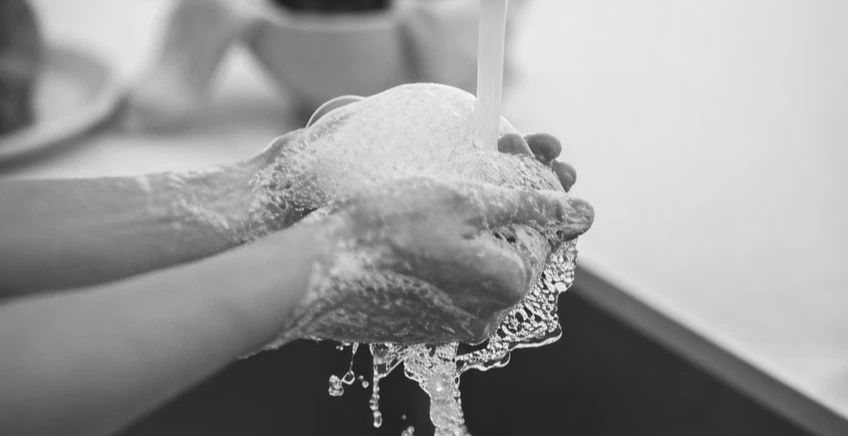
 When clients come to you for treatment, they’re literally putting their health in your hands. They rightfully expect that you’re taking every step possible to ensure the instruments used in their treatment are as clean and sanitary as possible. For your protection (from health risks as well as potential legal action) and theirs, it’s essential that you follow a thorough and effective sterilization regimen for your instruments after every use.
Let’s start with some basics.
Ultrasonic Cleaning
First, every instrument that comes into contact with a client’s skin requires ultrasonic cleaning. The purpose of this cleaning is to remove larger bits of material (hair, tissue, blood, etc.) from the 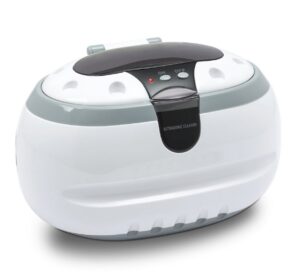 instruments prior to sterilization. If this isn’t done, the material may “bake on” to instruments, preventing complete sterilization and possibly even causing damage to your costly instruments.
Typically, instruments are bathed in an enzyme-based cleaning solution during the ultrasonic cleaning procedure to ensure the complete breakdown and removal of any debris on the instruments.
We recommend the following products for this Ultrasonic Cleaning step:
Sterilization
Following the ultrasonic cleaning process, you’ll need to sterilize your instruments to make sure they’re completely germ-free and safe to use on your next patient. You have two choices of methods for this step: dry heat sterilization and autoclave sterilization. Each has its advantages and disadvantages, and we’ll discuss them below.
Dry Heat Sterilization
As implied by the name, dry heat sterilization essentially amounts to heating instruments in a small oven to a temperature 320 to 360 degrees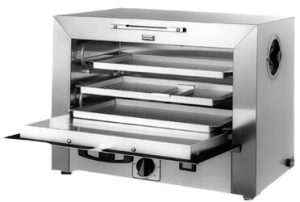 Fahrenheit in order to “kill off” bacteria. This method is well-suited for instruments that are prone to rust—such as tweezers—and glassware. Each instrument or item should be thoroughly dried then placed in individual dry heat sterilization pouches prior to being placed in the sterilizer then left in the pouches until they are to be used.
Pros:
– Heating units are economically priced
Cons:
– Depending on temperature, sterilization cycle may take 60 – 120 minutes in addition to heat up/cool downtime
– Less energy efficient than steam or moist heat
For dry heat sterilization, we recommend the following equipment and products:
Autoclave Sterilization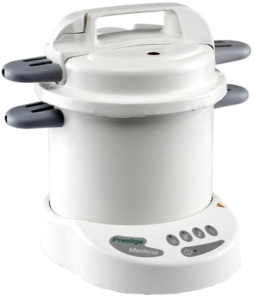
Though dry heat sterilization is a perfectly acceptable method of sterilizing tools, autoclave sterilization is widely regarded to be more thorough and effective. Also, this method isn’t as harsh on instruments and many practitioners believe this preserves them longer (saving money on replacements!) Autoclave sterilization is faster and more efficient than dry heat but also requires more of an upfront investment in equipment. However, this money can be recovered over time through savings in energy and cycle times. As with dry heat sterilization, instruments should be completely dried before being placed in special pouches prior to being inserted into the autoclave and should remain in the pouches until they are to be used.
Pros:
– Higher heat and pressure significantly reduces cycle times to as short as 15 minutes
– More energy efficient than dry heating
– Preserves instruments, reducing replacement costs
Cons:
– Units typically more expensive. However, this cost is off-set by energy and cycle time savings as well as by extending instrument life.
For autoclave sterilization, we recommend the following equipment and products:
Biological Tests
 The final component in the sterilization process is biological testing. This step ensures your sterilizer is actually, well, sterilizing—and ensuring you are not putting yourself or your clients at risk. The testing process involves inserting an exposed test strip into your sterilizer along with instruments you would like to sterilize. Once the cycle is complete, you simply remove the test strip, place it in an included envelope (along with a control strip), then mail it back to a laboratory for testing. There are two types of tests:
As you can likely guess from the name, this test is the less costly of your options. However, you will have to purchase and apply your own First Class postage stamp to the return envelope. What’s more, you will only receive the results of your tests on a quarterly basis unless the returned strip is flagged as having failed—then you’ll be notified immediately.
The slightly more expensive Passport test includes two test strips instead of one. This is so you can place the strips in different areas of your sterilizer to make sure the equipment is in proper working order and completely effective. In addition, this test includes the necessary postage for your return envelope and results are delivered immediately after each test.
So, what happens with the test strips back at the lab? Simple. The strips are placed in an incubator for 1 to 7 days to see if anything (like bacterial cultures) develops. If not, your sterilizer is working just fine. If a culture does develop, you are notified immediately and you will either need to get your sterilizer repaired or invest in a new one. If you’re anxious to learn your results, you can even check them online at www.checkyourtest.com . As an added bonus, Prestige offers quantity discounts on biological tests for purchases of six or more of either type.
So there you have it—a solid starting point on sterilization basics. However, there’s more to know and we’ll cover that information in an upcoming blog post. As always, should you have any questions on sterilization—or any topic related to electrolysis or spa supplies, procedures and equipment—please do not hesitate to give us a call at 800-783-7403 during regular business hours (Central Time). We’ll do our best to help!
Additional Resources for Proper Procedure during the COVID-19 coronavirus outbreak


